
Happy Design Engineer’s Day!
Every project begins with an idea. Then come precise calculations. Every dimension, every detail and every decision matters — so that the…
Read MoreWhy can insulation get wet beneath an intact roof covering? Where does the membrane need support, and how wide should the laps be? A practical guide to vapour barrier installation on profiled steel decking, with dimensions and diagrams.
Reading time: 8 minutes.

Roof insulation can get wet even when the waterproofing above it is intact. Rain is not the only source of moisture: indoor air can carry it into the roof too. Tears, open seams and poorly sealed junctions in the vapour barrier leave a route into the roof build-up.
Here we look at vapour barrier installation for a flat roof on a structural profiled steel deck: preparing the substrate, providing support, forming laps and checking the work before laying insulation. This is a conventional warm roof, with the thermal insulation above the vapour barrier. Inverted roofs and rafter roofs require different details.
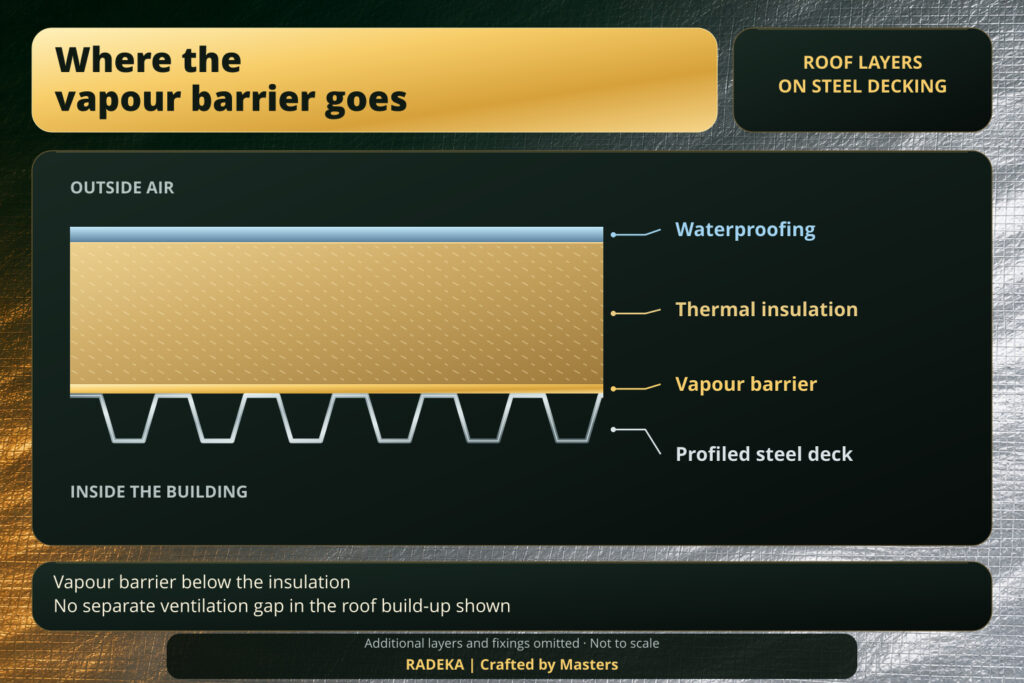
In the roof considered here, the main layers from bottom to top are the structural profiled steel deck, vapour barrier, thermal insulation and waterproofing membrane. A particular design may also include layers that form the falls, separation layers and other components. The vapour barrier limits the movement of water vapour from the interior into the roof, while the waterproofing above protects it from rain and snow.
That is why flat roof waterproofing needs to be considered as part of the whole build-up. Even a high-quality waterproofing membrane cannot make up for a break in the vapour barrier below. Equally, a vapour barrier cannot replace the roof waterproofing.
Check the continuity of the seal across the entire surface, including laps and junctions. A membrane with high water vapour resistance will not solve the problem if an unbonded channel remains between adjacent sheets.
Roofing work starts with checking the deck itself: does it match the design, are its fixings complete, and are the openings and support details ready? The vapour barrier must not conceal unfinished work. Openings and any required reinforcement should be included in the construction drawings in advance, particularly around penetrations and roof outlets.
Remove dust, swarf, metal offcuts, construction debris, snow and ice. Sharp particles are particularly troublesome when they become trapped beneath the membrane. The area may look tidy, yet pressing the membrane down or laying insulation over it can cause a puncture.
Remove oil contamination using a method compatible with both the metal’s protective coating and the adhesive system. Where a primer is specified, apply it to the prepared surface; it is not a substitute for cleaning. The substrate must be dry before bonding. After priming, allow the drying time stated in the primer documentation.
Inspect each area as work progresses. Cleaning the whole deck in the morning does not mean it will remain ready for bonding all day: swarf, dust or precipitation may reach it again.
Do not assume that the voids in the deck flutes can be left open at walls, movement joints and penetrations. Some roof constructions require non-combustible infill at these locations. Check whether that requirement applies to the chosen build-up.
Clause 5.2.4 of the Russian roofing code SP 17.13330.2017 applies to roofs that are not intended for regular access or use. Where the bottom insulation layer is in Russian combustibility group G2–G4, the flutes at the junctions specified in the code must be filled with group NG material, meaning non-combustible material, for a length of at least 250 mm. With several insulation layers, it is the bottom layer’s combustibility group that matters. Loose-fill insulation is not permitted for this purpose.
The installation detail may use closely fitted mineral wool inserts, with their positions and dimensions shown on the drawings. Even where this specific combustibility condition does not apply, the inserts cannot simply be omitted: the project design and chosen roofing system may impose further requirements.
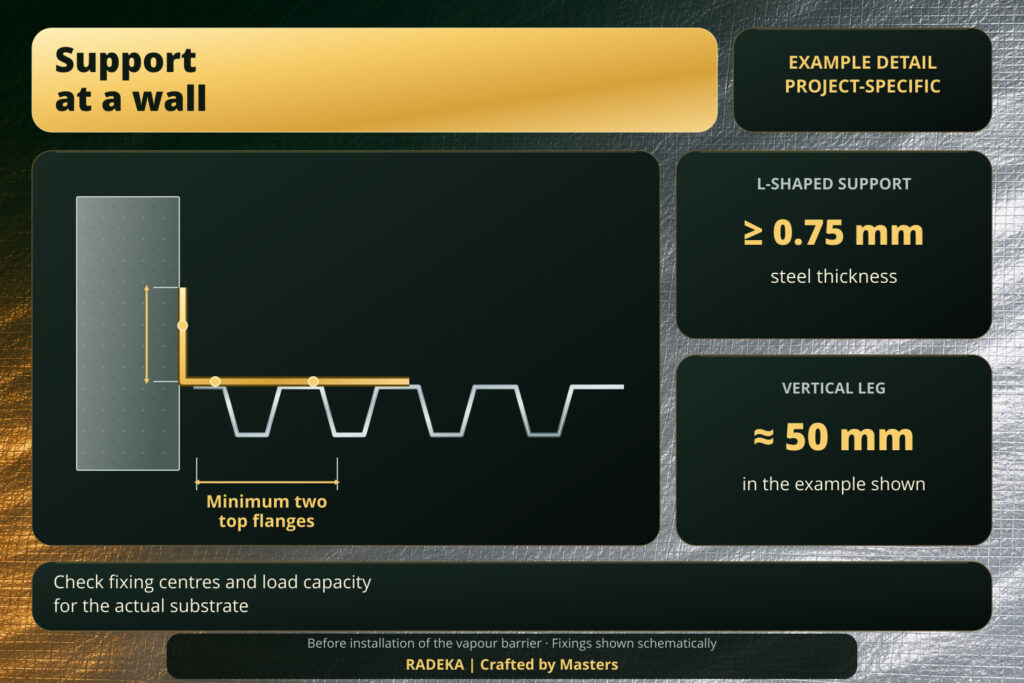
Profiled steel decking alternates between top flanges and troughs. Across the main roof area, this geometry is taken into account when setting out the membrane. At walls and around openings, additional continuous support is often needed. Without it, the membrane has to be bonded and rolled over an unsupported void.
One way to support the transition to a wall is with an L-shaped galvanised steel component. A support plate can be installed around a penetration. The dimensions below belong to one installation detail for a self-adhesive vapour barrier on profiled steel decking. They illustrate a support arrangement; they are not a universal specification for every roof.
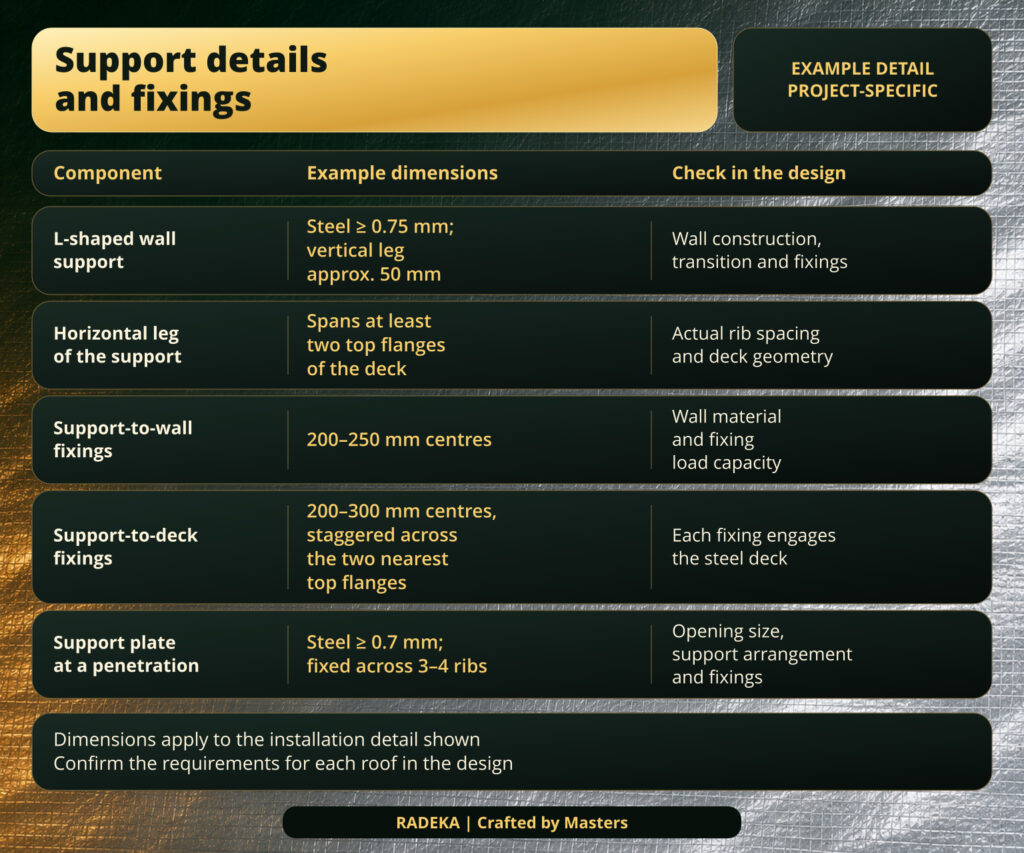
A small plate around an opening provides a surface for bonding the membrane and fixing components of the detail. It does not, by itself, establish that the cut deck’s load-bearing capacity has been restored. If the opening affects the structural behaviour of the deck, any reinforcement must be designed separately.
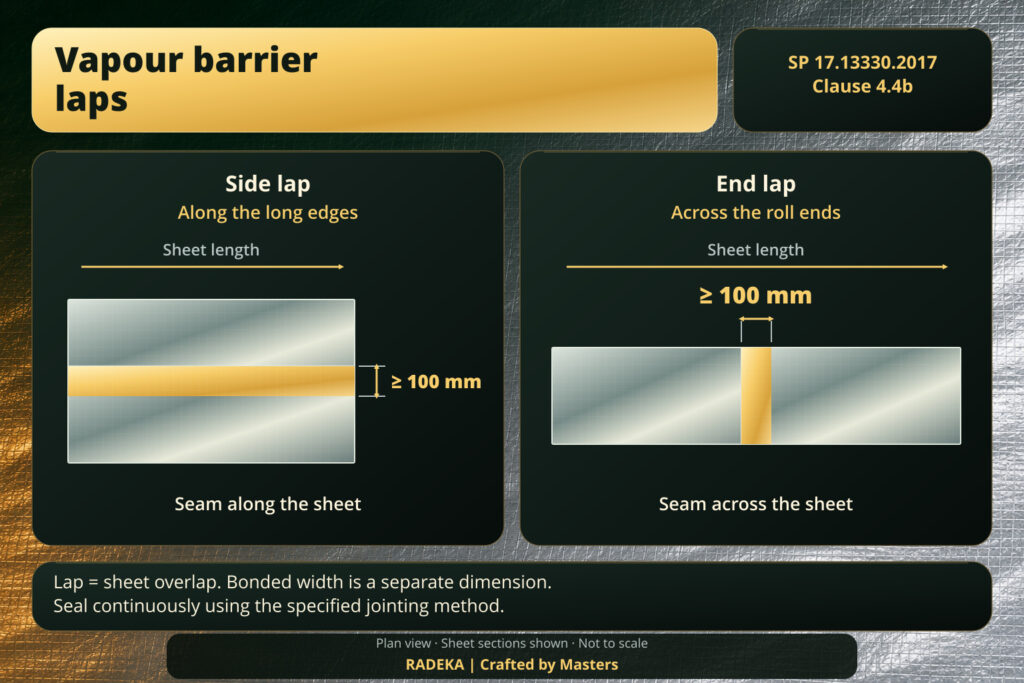
A lap is the strip where one sheet overlaps another. The bonded width is the actual width of the sealed joint within that strip. These dimensions can differ, so one must not be substituted for the other.
For roll vapour barriers, clause 4.4b of SP 17.13330.2017 specifies a minimum of 100 mm for both side laps along the long edges and end laps across the roll ends. The joint must be sealed. If the selected system’s documentation requires a larger overlap, use the larger dimension. The jointing method and effective bonded width are specified for the particular material.

Older installation manuals sometimes specify smaller side laps for particular self-adhesive materials. That dimension cannot be applied to every vapour barrier. If documents conflict, resolve the detail before installation rather than choosing the smaller figure on site.
First unroll the membrane for a trial fit. Check the direction, the position of the side seam and the allowance for the end lap. In the detail considered here, the sheets run along the deck ribs, with the side seam over a top flange. If the profile does not provide enough support, the design must include a separate support detail for the seam.
Once the sheet is aligned, bond the start of the roll and gradually peel away the release film. Smooth the membrane from the centre towards the edges to avoid trapping air or forming a wrinkle. Press the laps with the tool specified in the installation method. Two sheets touching each other does not necessarily mean that they have formed a sealed joint.
Stagger the end laps of adjacent sheets by the distance stated in the system documentation. Before covering the layer, repair punctures and cuts with compatible repair materials, maintaining the specified overlap around each damaged area.
In the unventilated roof on profiled steel decking considered here, there is no separate ventilation gap between the vapour barrier and the thermal insulation. The insulation is laid directly above the vapour barrier in accordance with the specified build-up. Rules for ventilation channels in pitched roofs cannot automatically be applied to this detail.
For self-adhesive materials, the temperature of the substrate, the roll itself and the air all matter. The low-temperature flexibility value in a technical data sheet is not the permitted application temperature. A membrane may remain intact in the cold but bond poorly to chilled metal.
Check the current system instructions for storage, conditioning in a warm environment and any permitted heating. Before starting, make sure the metal is free of frost and condensation. Heating must not damage the deck’s protective coating, the membrane or adjacent layers.
During breaks, protect the whole exposed area, including insulation edges and unfinished junctions. Some vapour barriers may be used as temporary waterproofing under specified conditions. Do not rely on this unless the product documentation explicitly permits it.
Allow a specific inspection stage at this point in the roofing work. Once the vapour barrier has been covered, an unbonded area will be much harder to find.
This staged approach to quality control is more useful than judging a finished roof by its appearance alone. If moisture appears later, it will be necessary to distinguish a defect in the waterproofing above from moisture entering from inside the building. We discuss this distinction in our article on the causes of leaks on terraces and balconies. While the layer is still exposed, the advantage is simple: every seam can be seen, checked and repaired without taking the roof apart.
RADEKA | Crafted by Masters